> ## Documentation Index
> Fetch the complete documentation index at: https://beta-guide.daro.so/llms.txt
> Use this file to discover all available pages before exploring further.
# Native Ads
> Implement native ads with the DARO Flutter SDK.
## Native Ad Format
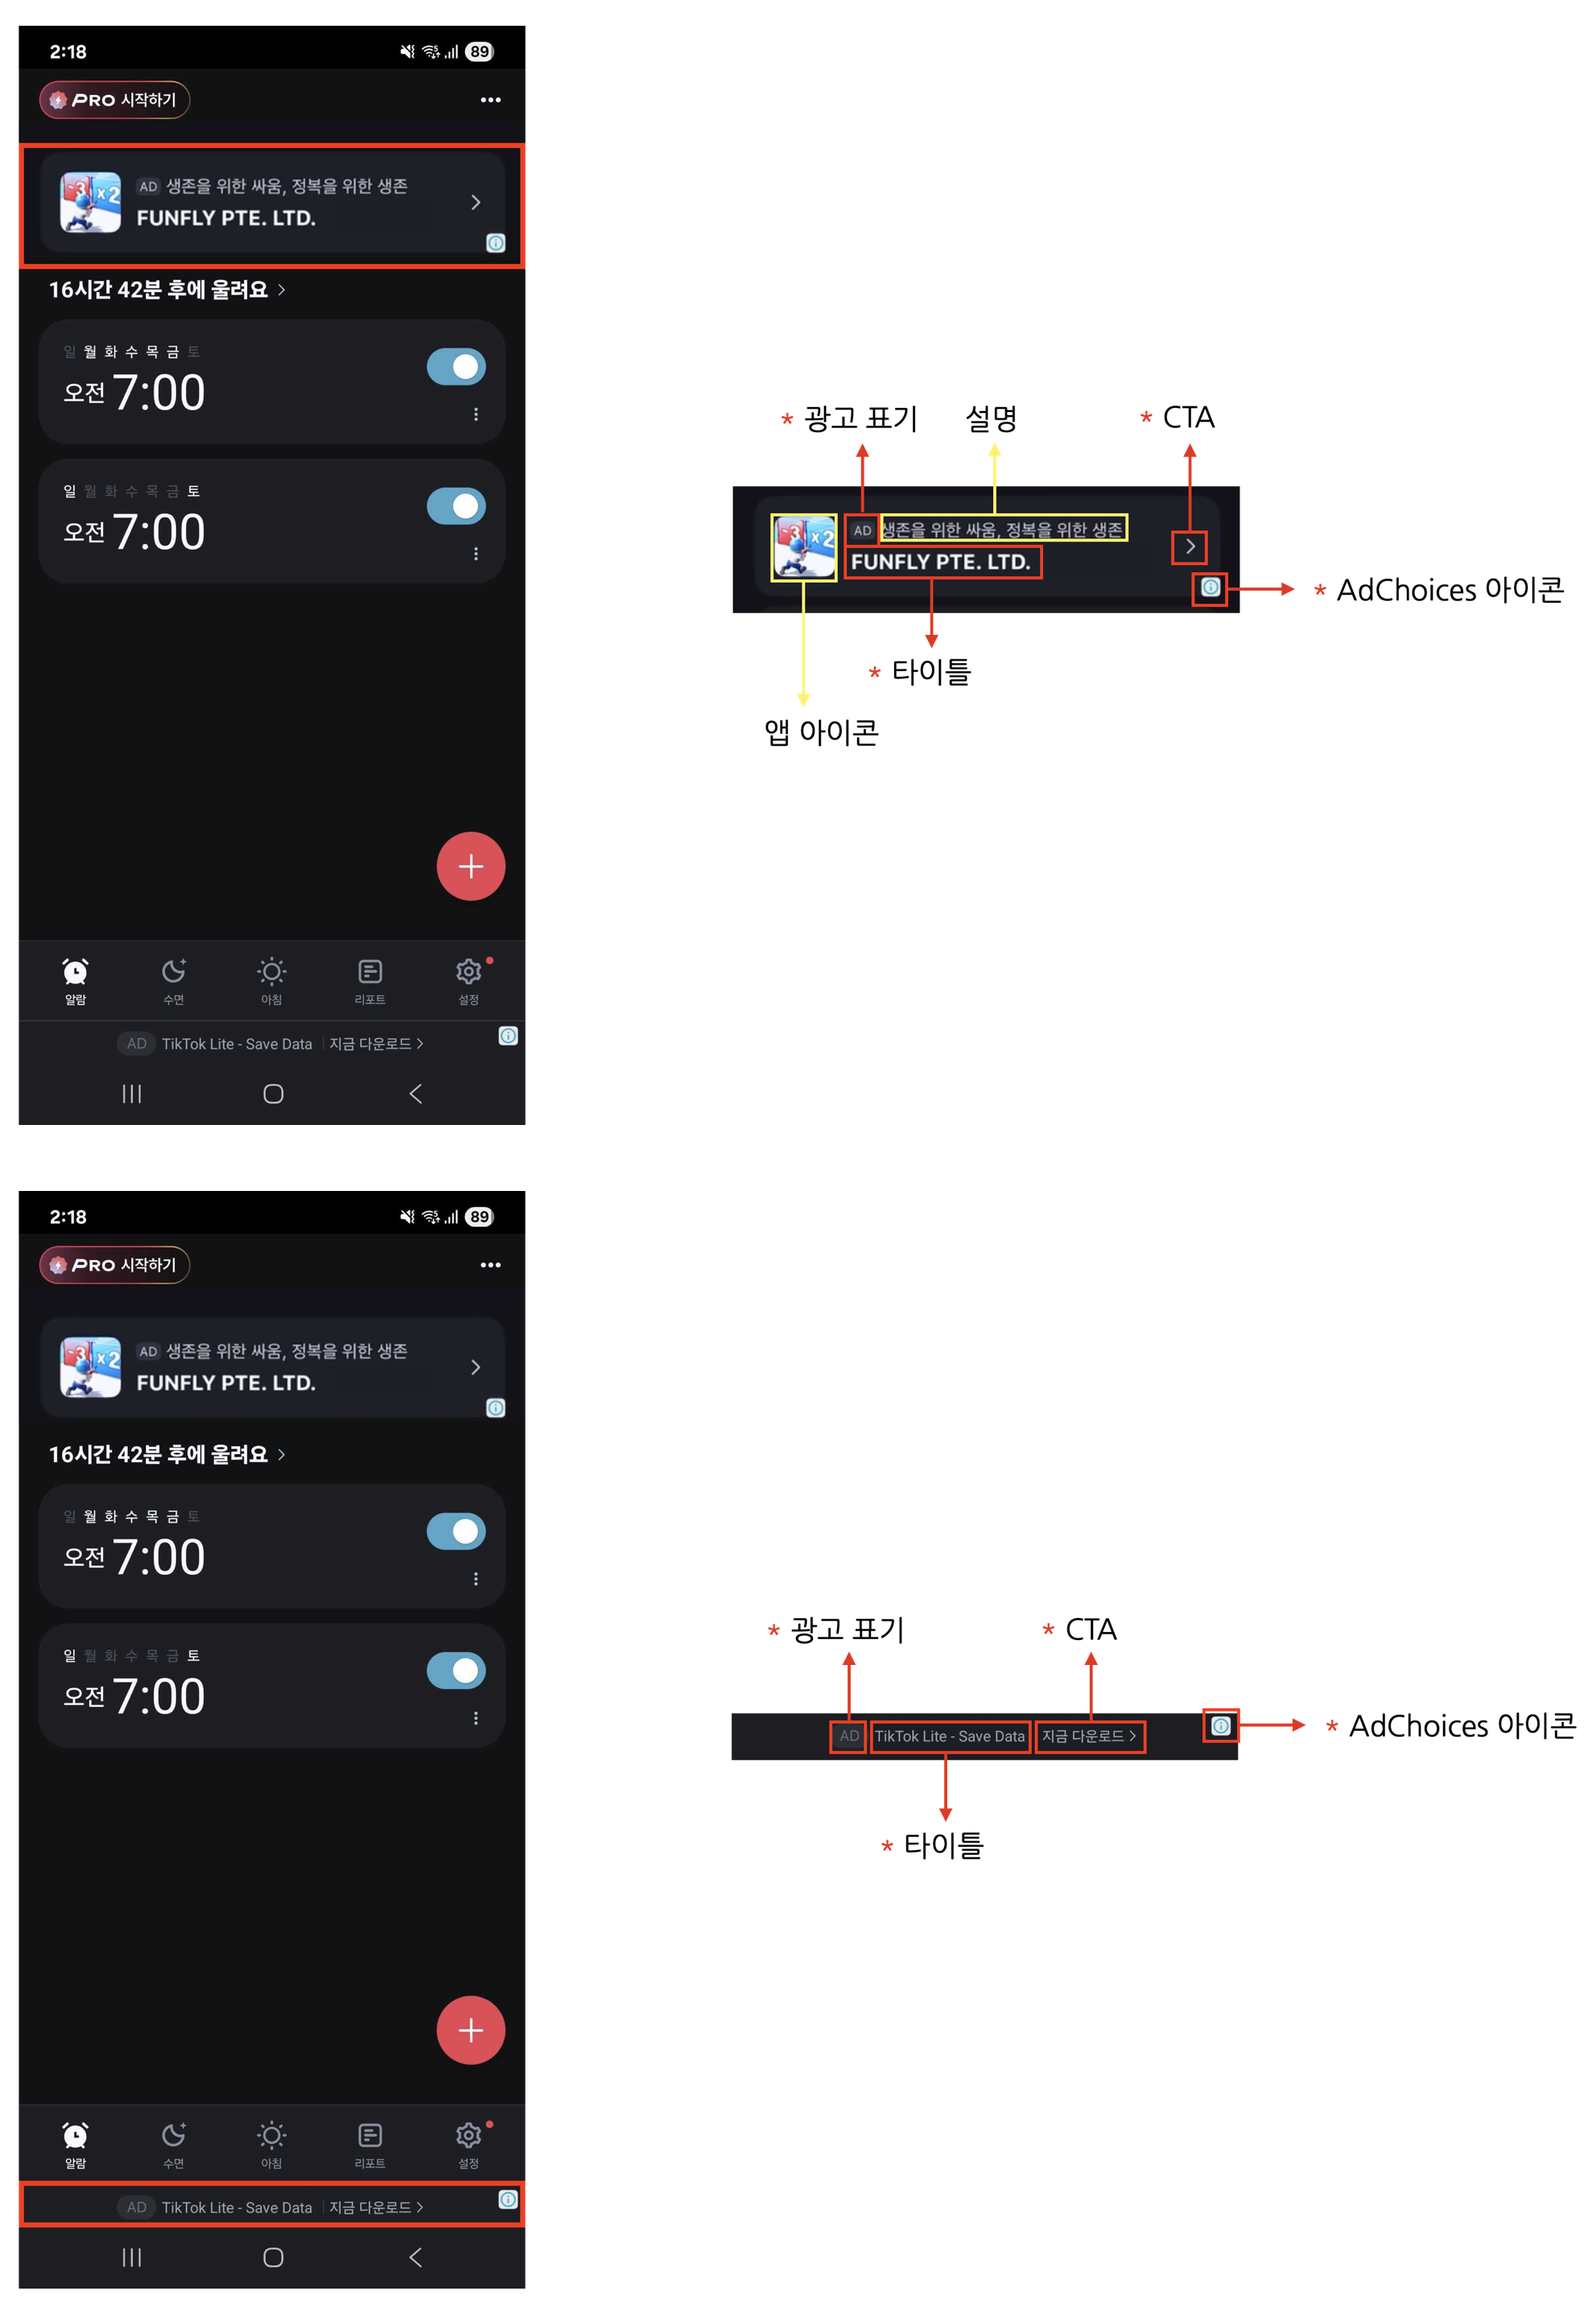
* Unlike other ad formats where the ad monetization SDK implements the ad view, native ads provide ad components for you to build the ad view directly.
* The key advantage is minimizing disruption by implementing layouts based on your UI/UX. However, you must include ad markers to prevent users from confusing ads with content.
**4 Required Native Ad Elements**
Native ads can be freely designed to match your app's UI, but the following **4 elements are mandatory**:
1. **Ad Label**: Add "AD" or similar text so users clearly recognize it as an advertisement.
2. **AdChoices Icon**: The AdChoices overlay icon enables users to identify and control ads, typically displayed as an 'ⓘ' icon. This icon is automatically added by the DARO SDK, so no separate implementation is required. It is placed in one of the four corners of the ad view (top-left, top-right, bottom-right, bottom-left), with bottom-right as the default. You can pick the corner via the `preferredAdChoicesPosition` option (see the [AdChoices Position](#adchoices-position) section below). Please lay out your ad view so the selected corner is not overlapped or obscured by other UI elements. The icon's appearance and behavior may vary depending on the ad source (demand).
3. **Ad Title**: Display the ad's headline.
4. **CTA (Call to Action)**: Include a CTA button such as "Install", "Open", "Download". The size and format are flexible.
***
## Registering Native Factory
To use native ads in Flutter, you must register a native ad factory on the native platform (iOS/Android). The `factoryId` is the identifier of the factory registered on the native platform.
Create a native ad layout file in `android/app/src/main/res/layout/`.
```xml sample_native_ad.xml theme={null}
```
Create a class that implements the `DaroNativeAdFactory` interface.
```kotlin SampleNativeAdFactory.kt theme={null}
import android.content.Context
import android.view.LayoutInflater
import android.view.View
import so.daro.flutter.native.DaroNativeAdFactory
import droom.daro.core.model.DaroNativeAdBinder
class SampleNativeAdFactory(private val context: Context) : DaroNativeAdFactory {
override fun createNativeAdView(): View {
return LayoutInflater.from(context).inflate(R.layout.sample_native_ad, null)
}
override fun createAdBinder(view: View): DaroNativeAdBinder {
return DaroNativeAdBinder.Builder(view)
.setTitleViewId(R.id.ad_headline)
.setBodyTextViewId(R.id.ad_body)
.setIconViewId(R.id.ad_app_icon)
.setMediaViewGroupId(R.id.ad_media)
.setCallToActionViewId(R.id.ad_call_to_action)
.build()
}
}
```
Register the factory in `configureFlutterEngine` of your `MainActivity`.
```kotlin MainActivity.kt theme={null}
import io.flutter.embedding.android.FlutterActivity
import io.flutter.embedding.engine.FlutterEngine
import so.daro.flutter.DaroFlutterPlugin
class MainActivity: FlutterActivity() {
override fun configureFlutterEngine(flutterEngine: FlutterEngine) {
super.configureFlutterEngine(flutterEngine)
DaroFlutterPlugin.registerNativeAdFactory(
flutterEngine,
"sample_native_ad",
SampleNativeAdFactory(this)
)
}
}
```
Create a factory class that implements the `DaroNativeAdFactory` protocol and a custom view that inherits from `DaroAdNativeView`.
```swift SampleNativeAdFactory.swift theme={null}
import UIKit
import daro_flutter
import Daro
class SampleNativeAdFactory: NSObject, DaroNativeAdFactory {
func createNativeAdView(unit: DaroAdUnit) -> DaroAdNativeView {
return SampleNativeAdContentView(unit: unit)
}
}
final class SampleNativeAdContentView: DaroAdNativeView {
init(unit: DaroAdUnit) {
super.init(unit: unit)
setupUI()
}
@available(*, unavailable)
public required init?(coder: NSCoder) {
fatalError("init(coder:) has not been implemented")
}
// Define UI elements
let iconImageView: UIImageView = {
let view = UIImageView()
view.contentMode = .scaleAspectFill
view.layer.cornerRadius = 8
view.clipsToBounds = true
return view
}()
let titleLabel: UILabel = {
let label = UILabel()
label.font = .systemFont(ofSize: 16, weight: .bold)
label.numberOfLines = 2
return label
}()
let advertiserLabel: UILabel = {
let label = UILabel()
label.font = .systemFont(ofSize: 13)
label.numberOfLines = 1
return label
}()
let bodyLabel: UILabel = {
let label = UILabel()
label.font = .systemFont(ofSize: 14)
label.numberOfLines = 2
return label
}()
let mediaContentView = UIView()
let callToActionButton: UIButton = {
let button = UIButton()
button.titleLabel?.font = .systemFont(ofSize: 16, weight: .bold)
button.backgroundColor = .systemBlue
button.layer.cornerRadius = 8
return button
}()
private func setupUI() {
// Configure layout (AutoLayout, etc.)
// ...
// Bind views to Daro SDK
bindViews(
titleLabel: titleLabel,
advertiserLabel: advertiserLabel,
bodyLabel: bodyLabel,
iconImageView: iconImageView,
mediaContentView: mediaContentView,
callToActionButton: callToActionButton
)
}
}
```
Register the factory in `application(_:didFinishLaunchingWithOptions:)` of your `AppDelegate`.
```swift AppDelegate.swift theme={null}
import Flutter
import UIKit
import daro_flutter
@main
@objc class AppDelegate: FlutterAppDelegate {
override func application(
_ application: UIApplication,
didFinishLaunchingWithOptions launchOptions: [UIApplication.LaunchOptionsKey: Any]?
) -> Bool {
GeneratedPluginRegistrant.register(with: self)
DaroFlutterPlugin.registerNativeAdFactory(
self,
factoryId: "sample_native_ad",
nativeAdFactory: SampleNativeAdFactory()
)
return super.application(application, didFinishLaunchingWithOptions: launchOptions)
}
}
```
The `factoryId` passed to `DaroNativeAd` must **exactly match** the factory ID registered on the native platform.
***
## Implementing Native Ads
Native ads follow a **Create Ad object → Load → Display widget → Dispose** pattern.
```dart theme={null}
import 'package:daro_flutter/daro_flutter.dart';
```
### 1. Create Ad Object
Create a `DaroNativeAd` object and configure callbacks.
```dart theme={null}
final nativeAd = DaroNativeAd(
adUnitId: '{YOUR_AD_UNIT_ID}',
factoryId: '{YOUR_FACTORY_ID}',
onAdLoaded: (adInfo) {
print('Native ad loaded: ${adInfo.adUnitId}');
setState(() {
_isAdLoaded = true;
});
},
onAdFailedToLoad: (error) {
print('Native ad failed to load: ${error.message}');
nativeAd.dispose();
},
onAdClicked: (adInfo) {
print('Native ad clicked');
},
onAdImpression: (adInfo) {
print('Native ad impression');
},
);
```
### 2. Load the Ad
```dart theme={null}
nativeAd.load();
```
### 3. Display the Widget
After the `onAdLoaded` callback fires, place the `DaroNativeAdWidget` in the widget tree.
```dart theme={null}
@override
Widget build(BuildContext context) {
return Column(
children: [
// ... other widgets
if (_isAdLoaded)
DaroNativeAdWidget(ad: nativeAd),
],
);
}
```
Placing `DaroNativeAdWidget` in the widget tree before calling `ad.load()` will throw a `FlutterError`. Always mount the widget after the `onAdLoaded` callback.
### 4. Dispose Resources
Call `dispose()` to clean up resources when leaving the page or when the ad is no longer needed.
```dart theme={null}
@override
void dispose() {
nativeAd.dispose();
super.dispose();
}
```
### Callback Reference
| Callback | Description |
| ------------------ | ----------------------------------------- |
| `onAdLoaded` | Called when the ad is successfully loaded |
| `onAdFailedToLoad` | Called when ad loading fails |
| `onAdClicked` | Called when the user clicks the ad |
| `onAdImpression` | Called when an ad impression is recorded |
***
## AdChoices Position
The `preferredAdChoicesPosition` option on `DaroNativeAd` lets you choose which corner the AdChoices icon renders in. When not specified, the bottom-right corner (`bottomRight`) is used. Supported on both iOS and Android (`daro_flutter` 1.0.3+).
```dart theme={null}
final nativeAd = DaroNativeAd(
adUnitId: '{YOUR_AD_UNIT_ID}',
factoryId: '{YOUR_FACTORY_ID}',
preferredAdChoicesPosition: DaroAdChoicesPosition.topLeft,
onAdLoaded: (adInfo) { /* ... */ },
onAdFailedToLoad: (error) { /* ... */ },
);
```
Supported values: `topLeft`, `topRight`, `bottomLeft`, `bottomRight`.
**Fixed at construction time**
`preferredAdChoicesPosition` is fixed when the `DaroNativeAd` instance is created and cannot be changed afterwards. To use a different position, create a new ad instance.
**Behavior varies by demand (preferred, not guaranteed)**
`preferredAdChoicesPosition` is a **preferred-position hint** passed to the underlying ad demand. The corner where the AdChoices icon actually renders depends on the implementation of the demand that fills the ad:
* Some demands honor the option as-is.
* Some demands ignore the option and enforce their own fixed position.
* Some demands replace the AdChoices icon with their own privacy control (such as a demand-specific ad badge).
When a demand ignores the option, the rendered control still satisfies that demand's compliance requirements. When designing your ad view layout, **assume the AdChoices icon or ad badge can appear in any of the four corners** and reserve sufficient padding accordingly.
***
## LINE Native Ads
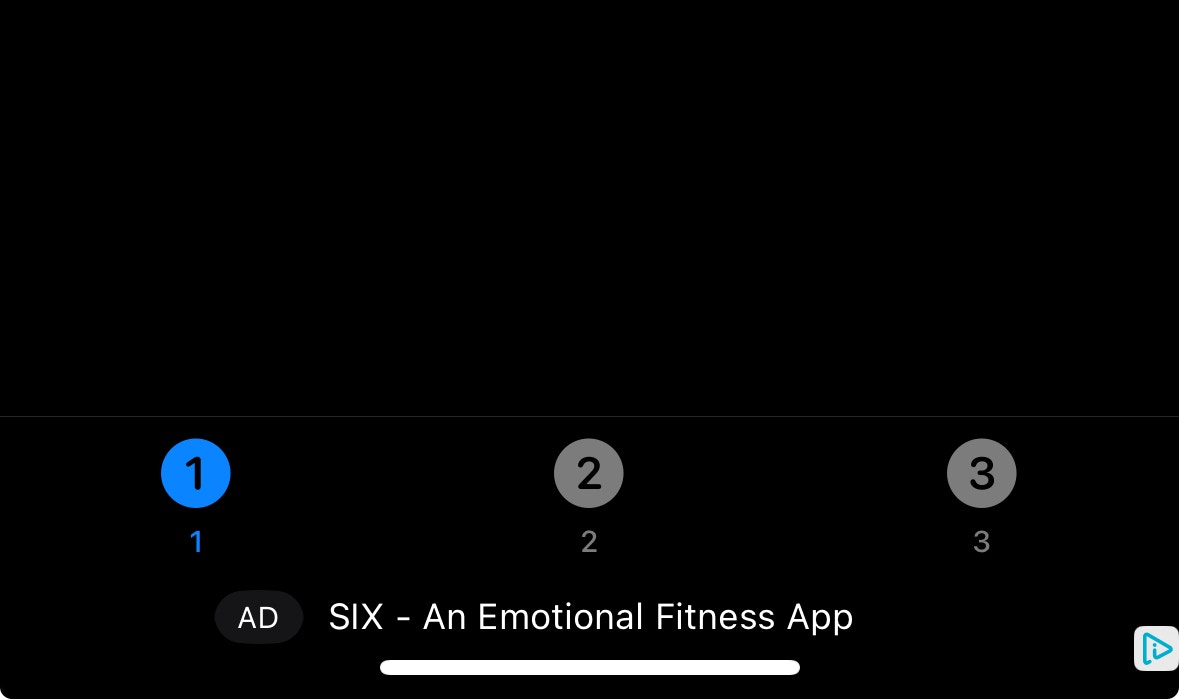
* LINE native ads are compact native ad formats designed to be naturally inserted into feeds or lists.
* They are more compact than standard native ads, ideal for embedding between list items.
* The ad height is fixed at **36dp (Android) / 36pt (iOS)**.
* Styles can be customized to match your app's UI.
### Implementing LINE Native Ads
LINE native ads follow the same **Create Ad object → Load → Display widget → Dispose** pattern.
#### 1. Create Ad Object
```dart theme={null}
final lineNativeAd = DaroLineNativeAd(
adUnitId: '{YOUR_AD_UNIT_ID}',
onAdLoaded: (adInfo) {
print('Line native ad loaded: ${adInfo.adUnitId}');
setState(() {
_isAdLoaded = true;
});
},
onAdFailedToLoad: (error) {
print('Line native ad failed to load: ${error.message}');
lineNativeAd.dispose();
},
onAdClicked: (adInfo) {
print('Line native ad clicked');
},
onAdImpression: (adInfo) {
print('Line native ad impression');
},
);
```
#### 2. Load the Ad
```dart theme={null}
lineNativeAd.load();
```
#### 3. Display the Widget
```dart theme={null}
if (_isAdLoaded)
DaroLineNativeAdWidget(ad: lineNativeAd),
```
Placing `DaroLineNativeAdWidget` in the widget tree before calling `ad.load()` will throw a `FlutterError`. Always mount the widget after the `onAdLoaded` callback.
#### 4. Dispose Resources
```dart theme={null}
@override
void dispose() {
lineNativeAd.dispose();
super.dispose();
}
```
### Callback Reference
| Callback | Description |
| ------------------ | ----------------------------------------- |
| `onAdLoaded` | Called when the ad is successfully loaded |
| `onAdFailedToLoad` | Called when ad loading fails |
| `onAdClicked` | Called when the user clicks the ad |
| `onAdImpression` | Called when an ad impression is recorded |
### Style Customization
Use `DaroLineNativeAdStyle` to customize LINE native ad colors. Pass the style when creating the `DaroLineNativeAd` object.
```dart theme={null}
final lineNativeAd = DaroLineNativeAd(
adUnitId: '{YOUR_AD_UNIT_ID}',
style: DaroLineNativeAdStyle(
backgroundColor: Colors.white,
contentColor: Colors.black,
adMarkLabelTextColor: Colors.white,
adMarkLabelBackgroundColor: Colors.grey,
),
onAdLoaded: (adInfo) {
print('Line native ad loaded');
setState(() {
_isAdLoaded = true;
});
},
onAdFailedToLoad: (error) {
print('Line native ad failed: ${error.message}');
lineNativeAd.dispose();
},
);
```
#### Style Properties
| Property | Type | Description |
| ---------------------------- | -------- | ------------------------------ |
| `backgroundColor` | `Color?` | Overall ad background color |
| `contentColor` | `Color?` | Ad content text color |
| `adMarkLabelTextColor` | `Color?` | Ad mark label text color |
| `adMarkLabelBackgroundColor` | `Color?` | Ad mark label background color |
 ### Implementing LINE Native Ads
LINE native ads follow the same **Create Ad object → Load → Display widget → Dispose** pattern.
#### 1. Create Ad Object
```dart theme={null}
final lineNativeAd = DaroLineNativeAd(
adUnitId: '{YOUR_AD_UNIT_ID}',
onAdLoaded: (adInfo) {
print('Line native ad loaded: ${adInfo.adUnitId}');
setState(() {
_isAdLoaded = true;
});
},
onAdFailedToLoad: (error) {
print('Line native ad failed to load: ${error.message}');
lineNativeAd.dispose();
},
onAdClicked: (adInfo) {
print('Line native ad clicked');
},
onAdImpression: (adInfo) {
print('Line native ad impression');
},
);
```
#### 2. Load the Ad
```dart theme={null}
lineNativeAd.load();
```
#### 3. Display the Widget
```dart theme={null}
if (_isAdLoaded)
DaroLineNativeAdWidget(ad: lineNativeAd),
```
### Implementing LINE Native Ads
LINE native ads follow the same **Create Ad object → Load → Display widget → Dispose** pattern.
#### 1. Create Ad Object
```dart theme={null}
final lineNativeAd = DaroLineNativeAd(
adUnitId: '{YOUR_AD_UNIT_ID}',
onAdLoaded: (adInfo) {
print('Line native ad loaded: ${adInfo.adUnitId}');
setState(() {
_isAdLoaded = true;
});
},
onAdFailedToLoad: (error) {
print('Line native ad failed to load: ${error.message}');
lineNativeAd.dispose();
},
onAdClicked: (adInfo) {
print('Line native ad clicked');
},
onAdImpression: (adInfo) {
print('Line native ad impression');
},
);
```
#### 2. Load the Ad
```dart theme={null}
lineNativeAd.load();
```
#### 3. Display the Widget
```dart theme={null}
if (_isAdLoaded)
DaroLineNativeAdWidget(ad: lineNativeAd),
```