> ## Documentation Index
> Fetch the complete documentation index at: https://beta-guide.daro.so/llms.txt
> Use this file to discover all available pages before exploring further.
# 네이티브 광고
> DARO Flutter SDK를 통해 네이티브 광고를 구현하는 방법을 알아봅니다.
## 네이티브 광고 형태 소개
* 광고 뷰를 광고 수익화 SDK가 구현해주는 타 광고 형태와 달리 네이티브 광고 형태는 구성 요소들을 전달받아 앱에서 직접 광고 뷰를 구현합니다.
* UI/UX 기반으로 레이아웃을 직접 구현하므로써 위화감을 적게 만들 수 있다는 것이 가장 큰 특징입니다. 단, 유저가 광고가 아닌 컨텐츠로써 착각하는 경우를 방지하기 위해 광고 표시와 함께 최소한의 차별성은 부여해야합니다.
**네이티브 광고 필수 요소 4가지**
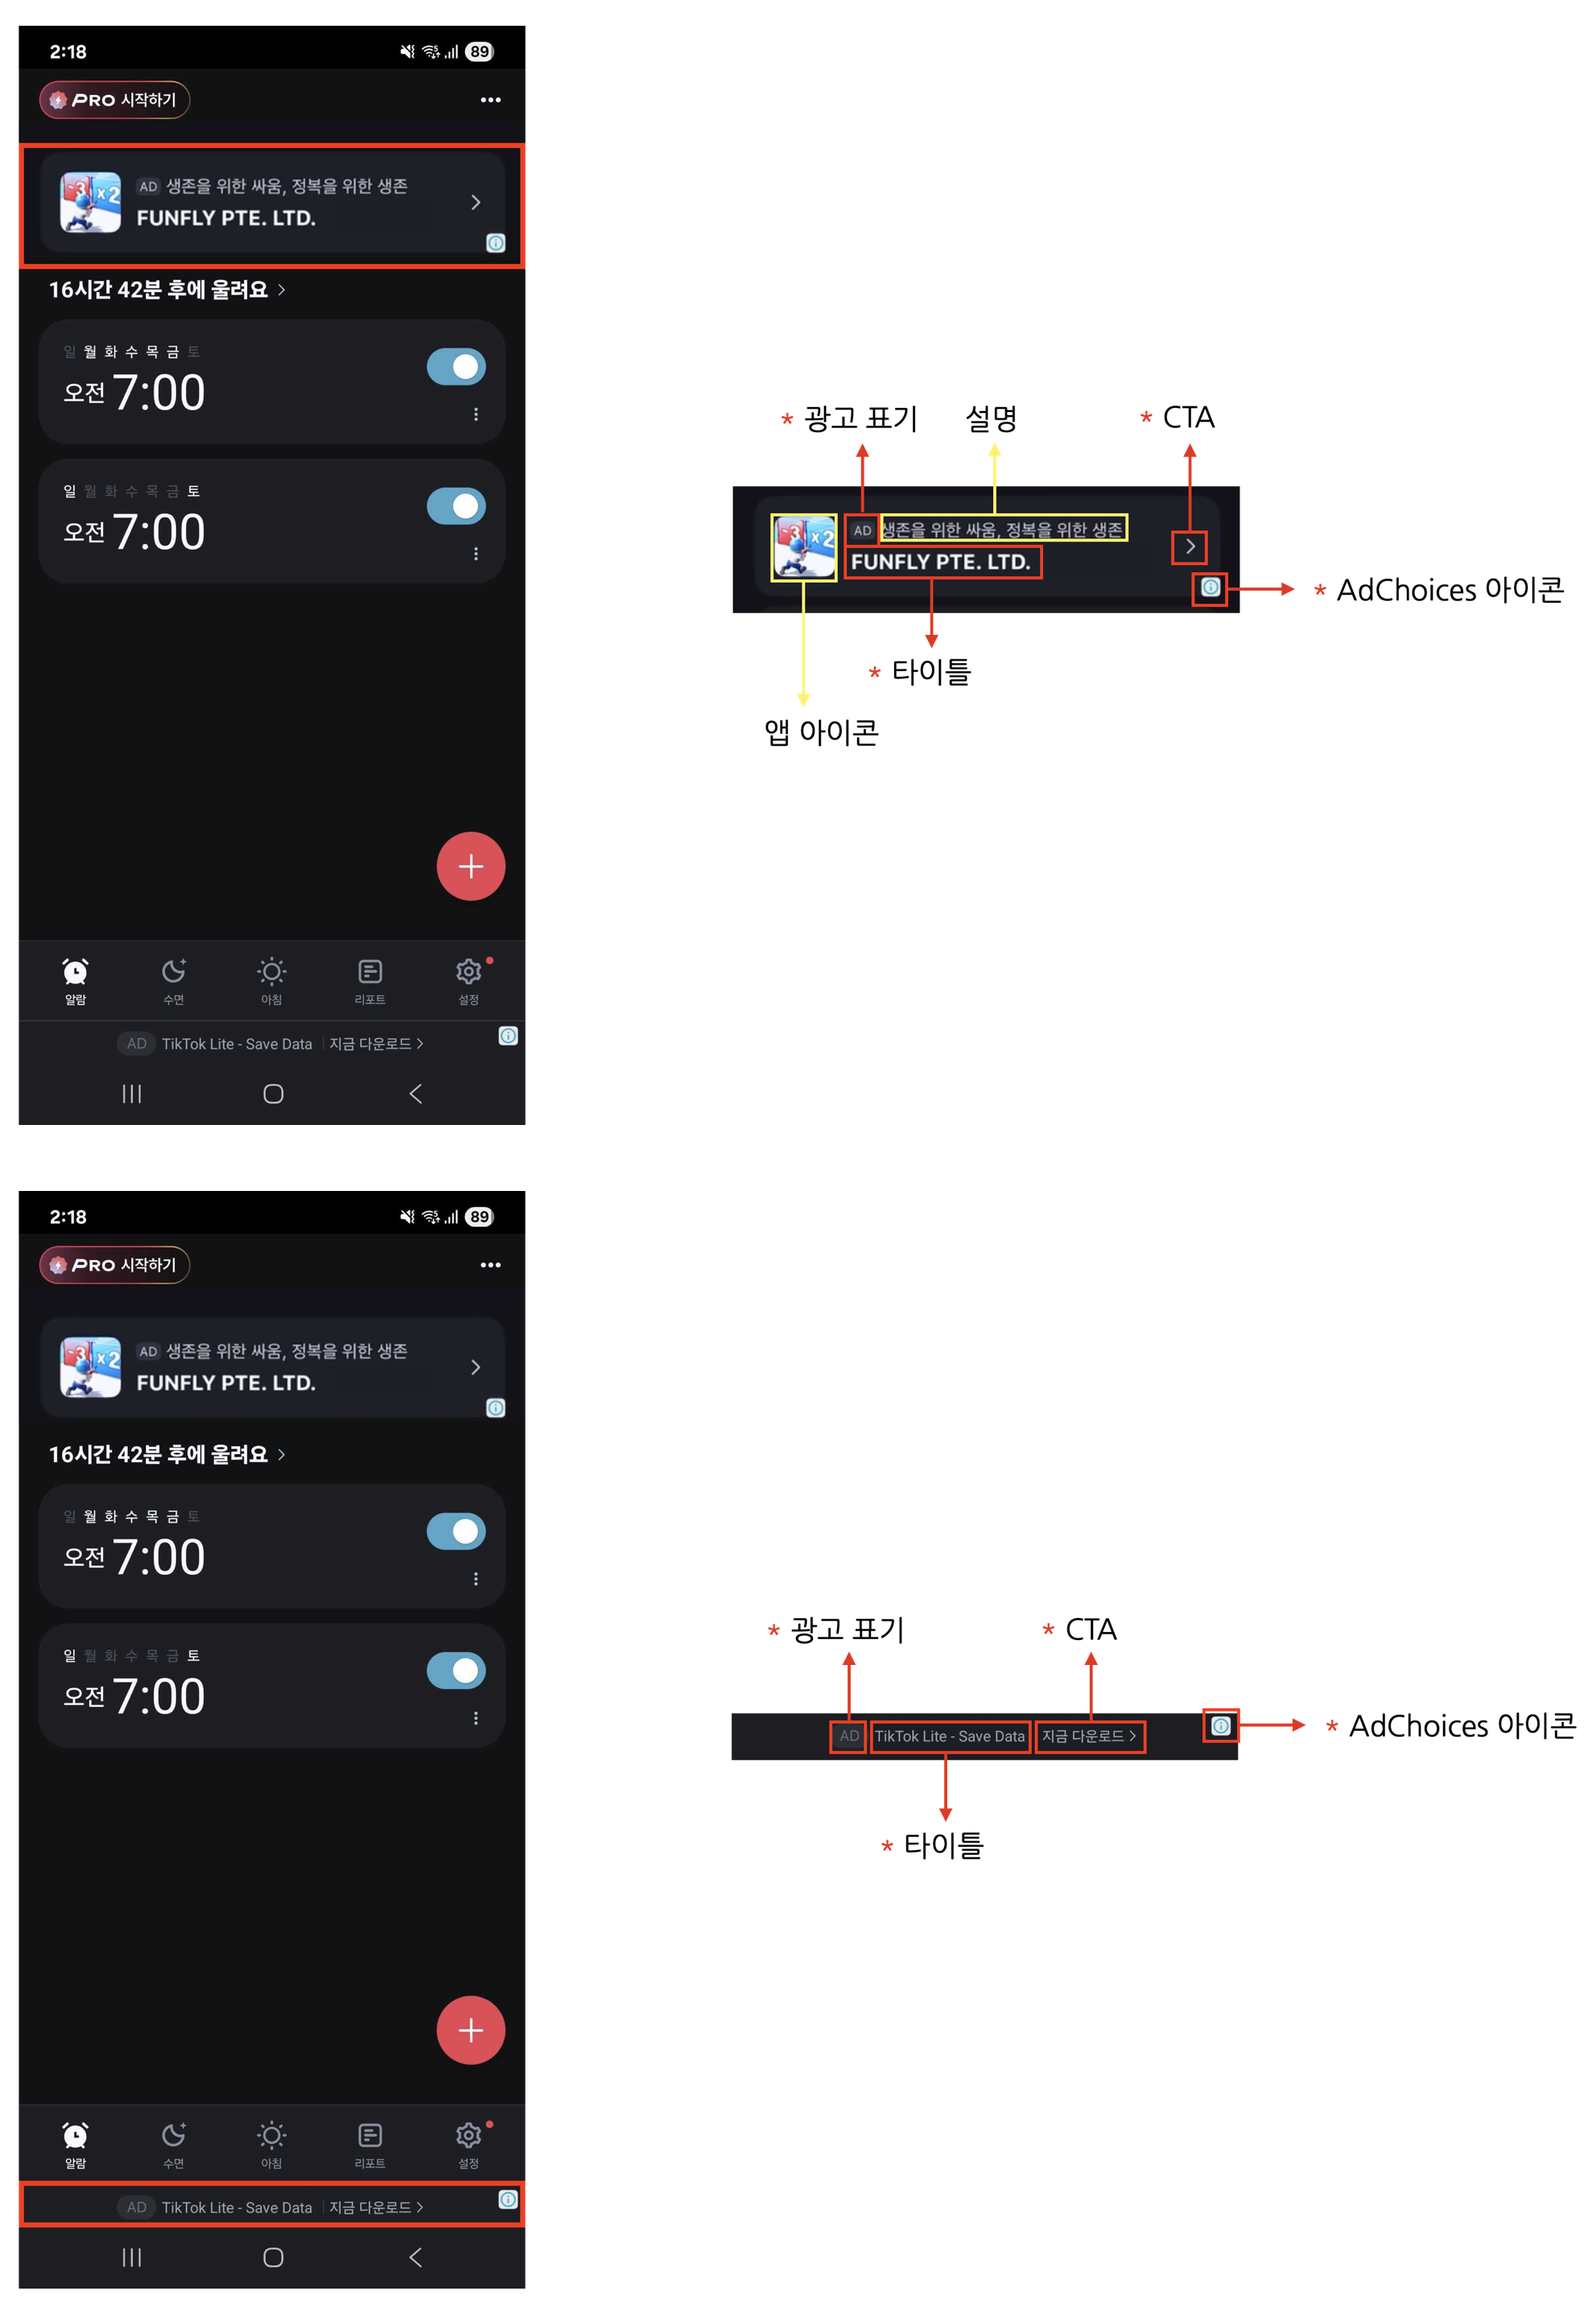
네이티브 광고는 앱 UI에 맞게 자유롭게 디자인할 수 있지만, 아래의 **4가지 필수 요소는 반드시 포함**해야 합니다. 이는 사용자가 광고임을 명확히 인지하도록 하고, 광고주가 기대하는 최소한의 광고 효과를 보장하기 위한 광고 정책입니다.
1. 광고 표기 : 사용자가 광고임을 명확히 인지할 수 있도록 광고 영역에 "AD", "광고" 등의 표기를 추가해 주세요.
2. AdChoices 아이콘 : AdChoices 아이콘은 사용자가 광고를 식별하고 제어할 수 있도록 제공되는 아이콘으로, 일반적으로 'ⓘ' 모양으로 표시됩니다. 해당 아이콘은 DARO SDK에서 자동으로 삽입되므로 별도 구현은 필요하지 않습니다. 광고 뷰의 4개 모서리(좌상단/우상단/우하단/좌하단) 중 한 곳에 배치되며, 기본 위치는 우하단입니다. `preferredAdChoicesPosition` 옵션으로 원하는 모서리를 선택할 수 있으니 (자세한 내용은 아래 [AdChoices 표시 위치](#adchoices-표시-위치) 섹션 참고), 해당 위치가 다른 UI 요소와 겹치거나 가려지지 않도록 광고 뷰를 구성해 주세요. 광고 소스(디맨드)에 따라 아이콘의 형태나 동작이 다를 수 있습니다.
3. 광고 제목 (타이틀) : 광고의 제목을 표시해야 합니다.
4. 클릭 유도 문안(CTA) : "설치", "열기", "다운로드" 등의 CTA(Call to Action) 버튼을 반드시 포함해 주세요. 버튼의 크기나 형태는 자유롭게 구성할 수 있으며, 상황에 따라 텍스트 필드로 대체 가능합니다. 광고 소스(디맨드)에서 CTA 문구를 제공하므로, 특정 문구를 고정할 필요는 없습니다.
***
## 네이티브 팩토리 등록
Flutter에서 네이티브 광고를 사용하려면 네이티브 플랫폼(iOS/Android)에서 네이티브 광고 팩토리를 등록해야 합니다. `factoryId`는 네이티브 플랫폼에서 등록한 팩토리의 식별자입니다.
`android/app/src/main/res/layout/` 에 네이티브 광고 레이아웃 파일을 생성합니다.
```xml sample_native_ad.xml theme={null}
```
`DaroNativeAdFactory` 인터페이스를 구현하는 클래스를 생성합니다.
```kotlin SampleNativeAdFactory.kt theme={null}
import android.content.Context
import android.view.LayoutInflater
import android.view.View
import so.daro.flutter.native.DaroNativeAdFactory
import droom.daro.core.model.DaroNativeAdBinder
class SampleNativeAdFactory(private val context: Context) : DaroNativeAdFactory {
override fun createNativeAdView(): View {
return LayoutInflater.from(context).inflate(R.layout.sample_native_ad, null)
}
override fun createAdBinder(view: View): DaroNativeAdBinder {
return DaroNativeAdBinder.Builder(view)
.setTitleViewId(R.id.ad_headline)
.setBodyTextViewId(R.id.ad_body)
.setIconViewId(R.id.ad_app_icon)
.setMediaViewGroupId(R.id.ad_media)
.setCallToActionViewId(R.id.ad_call_to_action)
.build()
}
}
```
`MainActivity`의 `configureFlutterEngine`에서 팩토리를 등록합니다.
```kotlin MainActivity.kt theme={null}
import io.flutter.embedding.android.FlutterActivity
import io.flutter.embedding.engine.FlutterEngine
import so.daro.flutter.DaroFlutterPlugin
class MainActivity: FlutterActivity() {
override fun configureFlutterEngine(flutterEngine: FlutterEngine) {
super.configureFlutterEngine(flutterEngine)
DaroFlutterPlugin.registerNativeAdFactory(
flutterEngine,
"sample_native_ad",
SampleNativeAdFactory(this)
)
}
}
```
`DaroNativeAdFactory` 프로토콜을 구현하는 팩토리 클래스와 `DaroAdNativeView`를 상속받는 커스텀 뷰를 생성합니다.
```swift SampleNativeAdFactory.swift theme={null}
import UIKit
import daro_flutter
import Daro
class SampleNativeAdFactory: NSObject, DaroNativeAdFactory {
func createNativeAdView(unit: DaroAdUnit) -> DaroAdNativeView {
return SampleNativeAdContentView(unit: unit)
}
}
final class SampleNativeAdContentView: DaroAdNativeView {
init(unit: DaroAdUnit) {
super.init(unit: unit)
setupUI()
}
@available(*, unavailable)
public required init?(coder: NSCoder) {
fatalError("init(coder:) has not been implemented")
}
// UI 요소 정의
let iconImageView: UIImageView = {
let view = UIImageView()
view.contentMode = .scaleAspectFill
view.layer.cornerRadius = 8
view.clipsToBounds = true
return view
}()
let titleLabel: UILabel = {
let label = UILabel()
label.font = .systemFont(ofSize: 16, weight: .bold)
label.numberOfLines = 2
return label
}()
let advertiserLabel: UILabel = {
let label = UILabel()
label.font = .systemFont(ofSize: 13)
label.numberOfLines = 1
return label
}()
let bodyLabel: UILabel = {
let label = UILabel()
label.font = .systemFont(ofSize: 14)
label.numberOfLines = 2
return label
}()
let mediaContentView = UIView()
let callToActionButton: UIButton = {
let button = UIButton()
button.titleLabel?.font = .systemFont(ofSize: 16, weight: .bold)
button.backgroundColor = .systemBlue
button.layer.cornerRadius = 8
return button
}()
private func setupUI() {
// 레이아웃 구성 (AutoLayout 등)
// ...
// Daro SDK에 뷰 바인딩
bindViews(
titleLabel: titleLabel,
advertiserLabel: advertiserLabel,
bodyLabel: bodyLabel,
iconImageView: iconImageView,
mediaContentView: mediaContentView,
callToActionButton: callToActionButton
)
}
}
```
`AppDelegate`의 `application(_:didFinishLaunchingWithOptions:)`에서 팩토리를 등록합니다.
```swift AppDelegate.swift theme={null}
import Flutter
import UIKit
import daro_flutter
@main
@objc class AppDelegate: FlutterAppDelegate {
override func application(
_ application: UIApplication,
didFinishLaunchingWithOptions launchOptions: [UIApplication.LaunchOptionsKey: Any]?
) -> Bool {
GeneratedPluginRegistrant.register(with: self)
DaroFlutterPlugin.registerNativeAdFactory(
self,
factoryId: "sample_native_ad",
nativeAdFactory: SampleNativeAdFactory()
)
return super.application(application, didFinishLaunchingWithOptions: launchOptions)
}
}
```
Flutter의 `DaroNativeAd`에 전달하는 `factoryId`는 네이티브 플랫폼에서 등록한 팩토리 ID와 **정확히 일치**해야 합니다.
***
## 네이티브 광고 구현하기
네이티브 광고는 **Ad 객체 생성 → 로드 → 위젯 배치 → 해제**의 단계로 구현합니다.
```dart theme={null}
import 'package:daro_flutter/daro_flutter.dart';
```
### 1. Ad 객체 생성
`DaroNativeAd` 객체를 생성하고 콜백을 설정합니다.
```dart theme={null}
final nativeAd = DaroNativeAd(
adUnitId: '{YOUR_AD_UNIT_ID}',
factoryId: '{YOUR_FACTORY_ID}',
onAdLoaded: (adInfo) {
print('Native ad loaded: ${adInfo.adUnitId}');
setState(() {
_isAdLoaded = true;
});
},
onAdFailedToLoad: (error) {
print('Native ad failed to load: ${error.message}');
nativeAd.dispose();
},
onAdClicked: (adInfo) {
print('Native ad clicked');
},
onAdImpression: (adInfo) {
print('Native ad impression');
},
);
```
### 2. 광고 로드
```dart theme={null}
nativeAd.load();
```
### 3. 위젯 배치
`onAdLoaded` 콜백이 호출된 후 `DaroNativeAdWidget`을 위젯 트리에 배치합니다.
```dart theme={null}
@override
Widget build(BuildContext context) {
return Column(
children: [
// ... 다른 위젯들
if (_isAdLoaded)
DaroNativeAdWidget(ad: nativeAd),
],
);
}
```
`ad.load()`를 호출하기 전에 `DaroNativeAdWidget`을 위젯 트리에 배치하면 `FlutterError`가 발생합니다. 반드시 `onAdLoaded` 콜백 후에 위젯을 배치하세요.
### 4. 리소스 해제
페이지를 벗어나거나 광고가 더 이상 필요하지 않을 때 `dispose()`를 호출하여 리소스를 정리합니다.
```dart theme={null}
@override
void dispose() {
nativeAd.dispose();
super.dispose();
}
```
### 콜백 설명
| 콜백 | 설명 |
| ------------------ | ----------------------- |
| `onAdLoaded` | 광고가 성공적으로 로드되었을 때 호출됩니다 |
| `onAdFailedToLoad` | 광고 로드에 실패했을 때 호출됩니다 |
| `onAdClicked` | 사용자가 광고를 클릭했을 때 호출됩니다 |
| `onAdImpression` | 광고 노출이 기록되었을 때 호출됩니다 |
***
## AdChoices 표시 위치
`DaroNativeAd` 의 `preferredAdChoicesPosition` 옵션으로 광고 뷰 내에서 AdChoices 아이콘이 렌더되는 모서리를 지정할 수 있습니다. 지정하지 않으면 우하단(`bottomRight`)이 사용됩니다. iOS / Android 양 플랫폼에서 동일하게 지원됩니다 (`daro_flutter` 1.0.3+).
```dart theme={null}
final nativeAd = DaroNativeAd(
adUnitId: '{YOUR_AD_UNIT_ID}',
factoryId: '{YOUR_FACTORY_ID}',
preferredAdChoicesPosition: DaroAdChoicesPosition.topLeft,
onAdLoaded: (adInfo) { /* ... */ },
onAdFailedToLoad: (error) { /* ... */ },
);
```
지원 값: `topLeft`, `topRight`, `bottomLeft`, `bottomRight`.
**설정 시점 고정**
`preferredAdChoicesPosition` 은 `DaroNativeAd` 객체 생성 시점에 고정되며, 이후 변경할 수 없습니다. 다른 위치로 바꾸려면 광고 객체를 새로 생성해 주세요.
**디맨드별 동작 차이 (선호 위치, 보장 아님)**
`preferredAdChoicesPosition` 은 "이 위치에 AdChoices 아이콘을 넣어달라"고 디맨드에 요청하는 값입니다. 하지만 실제로 어디에 표시되는지는 각 디맨드가 결정하기 때문에 요청한 위치가 반드시 반영되지는 않습니다.
디맨드마다 반응이 다를 수 있습니다.
* 요청한 위치 그대로 반영하는 디맨드
* 요청을 무시하고 자체적으로 고정된 위치에 표시하는 디맨드
* AdChoices 아이콘 대신 자체 광고 표시(예: 광고 마크) 로 대체하는 디맨드
어느 경우든 광고 관련 컴플라이언스 요건은 충족됩니다.
따라서 광고 레이아웃을 디자인할 때는 **네 모서리 어디에든 AdChoices/광고 마크가 표시될 수 있다**고 가정하고, 각 모서리에 충분한 여백을 확보해두는 것을 권장합니다.
***
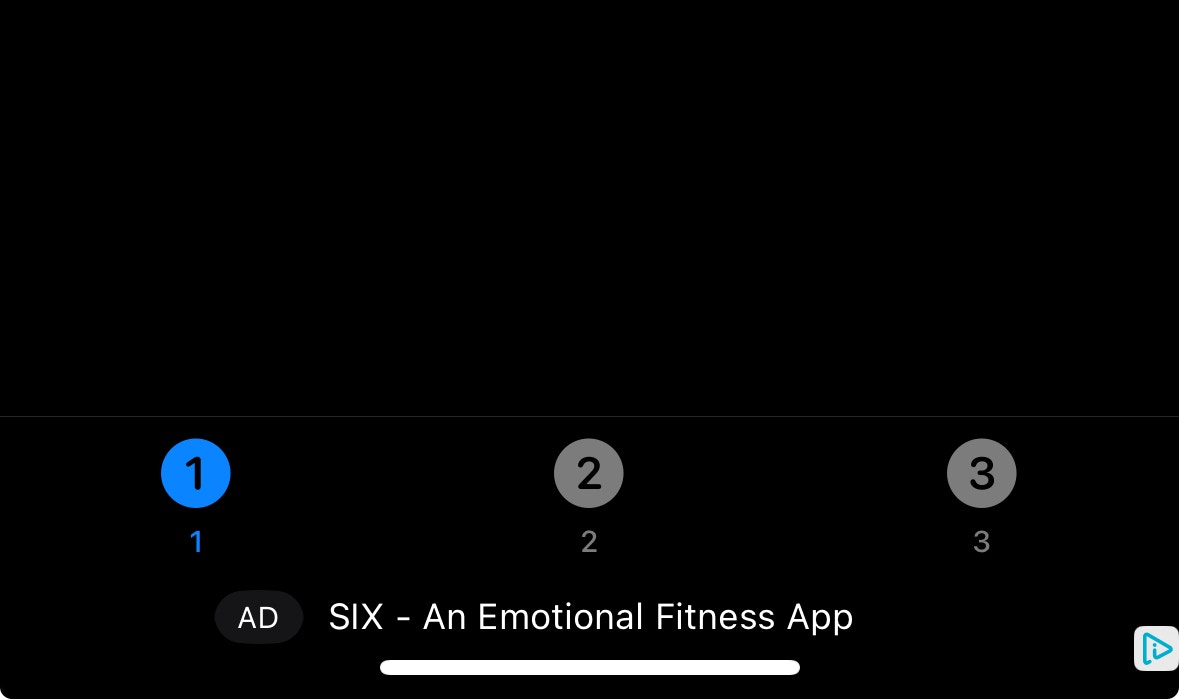
## LINE 네이티브 광고
* LINE 네이티브 광고는 앱의 피드나 리스트에 자연스럽게 삽입되는 소형 네이티브 광고 형태입니다.
* 일반 네이티브 광고보다 컴팩트한 형태로, 리스트 아이템 사이에 삽입하기에 적합합니다.
* 광고 높이는 **36dp (Android) / 36pt (iOS)** 로 고정됩니다.
* 스타일을 커스터마이징하여 앱의 UI에 맞게 조정할 수 있습니다.
### LINE 네이티브 광고 구현하기
LINE 네이티브 광고도 동일하게 **Ad 객체 생성 → 로드 → 위젯 배치 → 해제** 패턴을 따릅니다.
#### 1. Ad 객체 생성
```dart theme={null}
final lineNativeAd = DaroLineNativeAd(
adUnitId: '{YOUR_AD_UNIT_ID}',
onAdLoaded: (adInfo) {
print('Line native ad loaded: ${adInfo.adUnitId}');
setState(() {
_isAdLoaded = true;
});
},
onAdFailedToLoad: (error) {
print('Line native ad failed to load: ${error.message}');
lineNativeAd.dispose();
},
onAdClicked: (adInfo) {
print('Line native ad clicked');
},
onAdImpression: (adInfo) {
print('Line native ad impression');
},
);
```
#### 2. 광고 로드
```dart theme={null}
lineNativeAd.load();
```
#### 3. 위젯 배치
```dart theme={null}
if (_isAdLoaded)
DaroLineNativeAdWidget(ad: lineNativeAd),
```
`ad.load()`를 호출하기 전에 `DaroLineNativeAdWidget`을 위젯 트리에 배치하면 `FlutterError`가 발생합니다. 반드시 `onAdLoaded` 콜백 후에 위젯을 배치하세요.
#### 4. 리소스 해제
```dart theme={null}
@override
void dispose() {
lineNativeAd.dispose();
super.dispose();
}
```
### 콜백 설명
| 콜백 | 설명 |
| ------------------ | ----------------------- |
| `onAdLoaded` | 광고가 성공적으로 로드되었을 때 호출됩니다 |
| `onAdFailedToLoad` | 광고 로드에 실패했을 때 호출됩니다 |
| `onAdClicked` | 사용자가 광고를 클릭했을 때 호출됩니다 |
| `onAdImpression` | 광고 노출이 기록되었을 때 호출됩니다 |
### 스타일 커스터마이징
`DaroLineNativeAdStyle`을 사용하여 LINE 네이티브 광고의 색상을 커스터마이징할 수 있습니다. 스타일은 `DaroLineNativeAd` 객체 생성 시 전달합니다.
```dart theme={null}
final lineNativeAd = DaroLineNativeAd(
adUnitId: '{YOUR_AD_UNIT_ID}',
style: DaroLineNativeAdStyle(
backgroundColor: Colors.white,
contentColor: Colors.black,
adMarkLabelTextColor: Colors.white,
adMarkLabelBackgroundColor: Colors.grey,
),
onAdLoaded: (adInfo) {
print('Line native ad loaded');
setState(() {
_isAdLoaded = true;
});
},
onAdFailedToLoad: (error) {
print('Line native ad failed: ${error.message}');
lineNativeAd.dispose();
},
);
```
#### 스타일 속성
| 속성 | 타입 | 설명 |
| ---------------------------- | -------- | ------------- |
| `backgroundColor` | `Color?` | 광고 전체 배경색 |
| `contentColor` | `Color?` | 광고 콘텐츠 텍스트 색상 |
| `adMarkLabelTextColor` | `Color?` | 광고 마크 텍스트 색상 |
| `adMarkLabelBackgroundColor` | `Color?` | 광고 마크 배경색 |
 ### LINE 네이티브 광고 구현하기
LINE 네이티브 광고도 동일하게 **Ad 객체 생성 → 로드 → 위젯 배치 → 해제** 패턴을 따릅니다.
#### 1. Ad 객체 생성
```dart theme={null}
final lineNativeAd = DaroLineNativeAd(
adUnitId: '{YOUR_AD_UNIT_ID}',
onAdLoaded: (adInfo) {
print('Line native ad loaded: ${adInfo.adUnitId}');
setState(() {
_isAdLoaded = true;
});
},
onAdFailedToLoad: (error) {
print('Line native ad failed to load: ${error.message}');
lineNativeAd.dispose();
},
onAdClicked: (adInfo) {
print('Line native ad clicked');
},
onAdImpression: (adInfo) {
print('Line native ad impression');
},
);
```
#### 2. 광고 로드
```dart theme={null}
lineNativeAd.load();
```
#### 3. 위젯 배치
```dart theme={null}
if (_isAdLoaded)
DaroLineNativeAdWidget(ad: lineNativeAd),
```
### LINE 네이티브 광고 구현하기
LINE 네이티브 광고도 동일하게 **Ad 객체 생성 → 로드 → 위젯 배치 → 해제** 패턴을 따릅니다.
#### 1. Ad 객체 생성
```dart theme={null}
final lineNativeAd = DaroLineNativeAd(
adUnitId: '{YOUR_AD_UNIT_ID}',
onAdLoaded: (adInfo) {
print('Line native ad loaded: ${adInfo.adUnitId}');
setState(() {
_isAdLoaded = true;
});
},
onAdFailedToLoad: (error) {
print('Line native ad failed to load: ${error.message}');
lineNativeAd.dispose();
},
onAdClicked: (adInfo) {
print('Line native ad clicked');
},
onAdImpression: (adInfo) {
print('Line native ad impression');
},
);
```
#### 2. 광고 로드
```dart theme={null}
lineNativeAd.load();
```
#### 3. 위젯 배치
```dart theme={null}
if (_isAdLoaded)
DaroLineNativeAdWidget(ad: lineNativeAd),
```